


Creating a Table Schema
- Once the Database has been successfully opened - select the create table icon (
 ) or use the right mouse button to select 'Create table' or under the 'File' menu tab, select 'Create Table'.
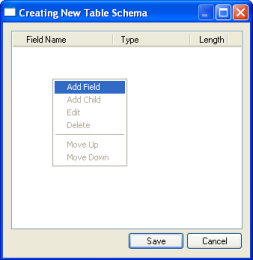
 - Once the 'Create Table' dialog appears (as below), use the right mouse button to add the desired fields.
- Click the 'Save' button once you have completed all your fields and follow the dialogs to choose a table name.
note: You are able to edit the table schema at any time if you wish to add, change or delete a field.
note: If you would like to open more than one table, repeat the process as describe above, and please keep in mind that all tables are open as the same transaction and will be saved or aborted together.
note: ObjectDatabase++ creates three files, the first (*.odt) contains the information about the table, its schema, has index and data. The second file is the table’s memory file (*.odm) that contains shared information about each transaction so no one resource is allocated twice. And lastly if appropriate is the index file (*.odi) which can be located on a different drive from the control, logging, table and memory files.
Listen All
Comments (0)
